Freedom for the mobiles
Why is it important to have privacy on the mobiles?
Mobiles📱 are not just a computing device in the hands it holds our banking information, our contacts, our social communication and also increasingly are becoming storage devices for our personal pictures and videos.
In todays world where Aadhaar number is linked to everything right from the mobile number to Bank Account, Insurance and even your railway ticket there is a dystopian world☠️ which is being created 😢 and its getting really important for us to safeguard☝️ our privacy and mobiles are the best place to start.
Factors affecting individuals opinion on privacy
An individual may or may not be concerned about his or her privacy. Some of the factors are
- Ignorance of cloud storage implications - What happens when the users personal data is uploaded to the cloud, how could the data be used?
- Ignorance of alternatives - Decentralised alternatives 💪 which keeps user privacy as first priority do exist!
- I don't care attitude - Well knowing the implications the user might not really be 😕 interested in protecting his/her own privacy. This happens mostly with techy users who prioritise convenience over privacy.
- Helplessness - Some people are well aware of privacy violations and feel helpless and just continue to use the services because they feel they can't do anything 😐 about it.
How to Flash ⚡️
Flashing should start with backing up the phone, enabling developer mode, interacting with adb and fastboot commands, unlocking the bootloader, installing twrp and then installing lineageos.
Backup your phone
One of the most important things to do before going anywhere with flashing is to backup your partitions.
- Use Export contacts to SD card in contacts options
- Take the gallery and move them to external SD Card or other computer
- Find out if apps offer other ways to backup their data- Mostly specific to the app.
- It doesn't hurt to just copy and backup the entire filesystem which is accessible. Some apps just need a folder to come back to old state.
Some terms to know
- adb - Android Debugger allows access for USB interaction. Gives access to filesystem and also allows rebooting to bootloader
- fastboot - Tool to interact with the bootloader. Bootloader mode is also known as fastboot mode where fastboot commands can be run.
- twrp - TW recovery project which stays in the recovery partion, it makes the flashing process more easy ( less commands)
Important partitions on an Android Phone
- Recovery - Flash via fastboot to install TWRP
- System - System files, dont flash ( not recommended )
- Data - Main place for the user data. Flashing it means all the data which is not backed up will be gone. This partitions needs to be flashed hence backup is important.
- cache/dalvik cache - Should be flashed
Enable developer mode
- Go to settings -> About Phone -> Build Number
- Keep pressing the build number multiple times to enable developer mode.
- You will see Developer Options - Inside that enable Android Debugging
ADB mode
Android Debugger also known as adb is used to create a shell connection for debugging purposes.
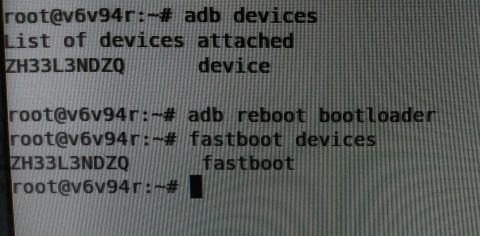
adb devicesshould list out the devices connected in ADB mode. It needs authorisation for USB debugging.adb reboot bootloadertakes you to fastboot mode
Fastboot mode
fastboot deviceslists the devices connected in fastboot mode. Please check and confirm that you device is listed.fastboot flash recovery twrp.imgshould flash the recovery with TWRP.fastboot oem unlockshould unlock the device.
Unlock the boot loader
- OEM Unlock is performed by the fastboot command of
oem unlockbut it might not be straightforward. Please search for "unlocking phonename modelnumber" and follow the instructions.
The recommended website would be XDA developers forum page for that particular model number. An example would be https://forum.xda-developers.com/g5 for Moto g5
TWRP - Team Works Recovery Project
First thing after unlocking is to flash twrp for that particular device. Please go to the official twrp release for the phone. https://twrp.me/Devices/ has a list of devices. Please download the image offered for your specific model. Please do check twice that its right model and version number.
Extract the twrp image file and using fastboot as mentioned above flash the recovery via the command fastboot flash recovery twrp.img
Lineage OS
Lineage OS gives us a clean build of Android without any bloat ware. Google Play store is not offered in the main distribution. It is recommended to enjoy the LineageOS clean features without flashing google 🤦 services.
Now all you need to do is to download the LineageOS Image and flash the phone with it.
Steps to follow are
- Enter TWRP mode
- Download https://download.lineageos.org/osprey where
ospreyis the android code name of moto g3. Every android phone has a code name and its important to the find the one specific to your phone. - Put the downloaded zip file in SD card or some partition on the phone which wont be wiped ( so dont put in /data ).
adb push filename.zip /sdcard/can push the downloaded file to that partition
- Wipe cache and data
- Install by pointing to the above downloaded zip
- Reboot and welcome to Lineage OS ♥️
Additional details
- LineageOS also offers a guide for flashing. Please check out device specific instructions at https://wiki.lineageos.org/devices/osprey/install
- Instead of LineageOS there is also http://www.resurrectionremix.com/ which is based on LineageOS but is a bit stylish.
- Follow only official guides and install only official ROMs in the begining as there is a huge probablity of bricking your phone.
- Avoid flashing if there is only unofficial twrp or unofficial lineageOS
- After rebooting to LineageOS enable developer mode and from your desktop you can run
adb install F-Droid.apkwhich will install the 100 % Free software app store for your phone. F-Droid 😍 can be downloaded at https://f-droid.org/FDroid.apk